OpenCV Installation
Starting with version 0.5 of this module, OpenCV scripting is also supported in clients and designers that have a compatible version of OpenCV installed locally. Perform the appropriate instructions below for any client or designer that will use/test OpenCV scripting.
Upon module load (or Vision client startup), the local system is searched for opencv.jar in certain standard locations for the platform. If found, it will be dynamically loaded and examined to determine the corresponding JNI name. The local system will be searched for that, too, to be loaded. Success and failure will be logged. Loading of the OpenCV JNI will automatically cause the FFmpeg dependencies to load, if present.
After the OpenCV JAR file is loaded, its packages and classes will be enumerated and assembled into jython modules under the system.cv2.* namespace. Each package will be logged, along with logging for classes handled specially. The content reported and handled varies by OpenCV version.
Windows 7+
64-bit Windows 10 is the primary test platform for development of this driver module under Windows. Manual installation of FFmpeg and OpenCV is required. Installation of the appropriate Microsoft Visual-C redistributable package may also be required. The instructions below should work for all versions of Windows from Windows 7 on.
FFmpeg
FFmpeg v4.2 is used to test this module in Windows 10. Newer release versions are also expected to work.
-
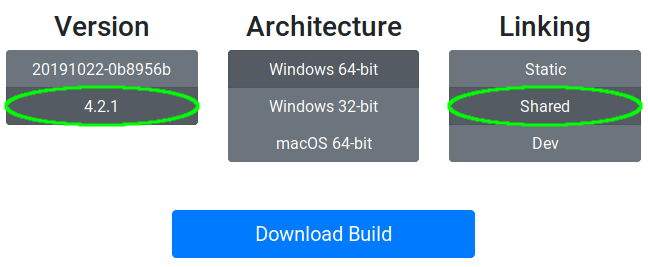
The official Windows releases of FFmpeg are distributed by Zeranoe. Select the release version with shared linking for your architecture, as shown to the right, and download that build.
-
Expand the FFmpeg build's zip file directly into C:\Program Files\, using the path names within to produce the FFmpeg folder hierarchy underneath. In 64-bit Windows, the resulting folder should be C:\Program Files\ffmpeg-4.2-win64-shared\ or similar.
-
Add the bin subfolder of the above hierarchy to the system PATH environment variable, as shown in the System Settings section below. OpenCV will use this path to find FFmpeg when its own DLL is loaded within Ignition.
OpenCV
OpenCV v3.2.0 is used to test this module in Windows 10. Other release versions in the v3.x (x>=2) and v4.x series are expected to work. Newer versions will expose more data types, functions, and constants in the scripting namespaces. Versions as old as v2.4.9 are known to have java bindings and may work, but are officially unsupported.
-
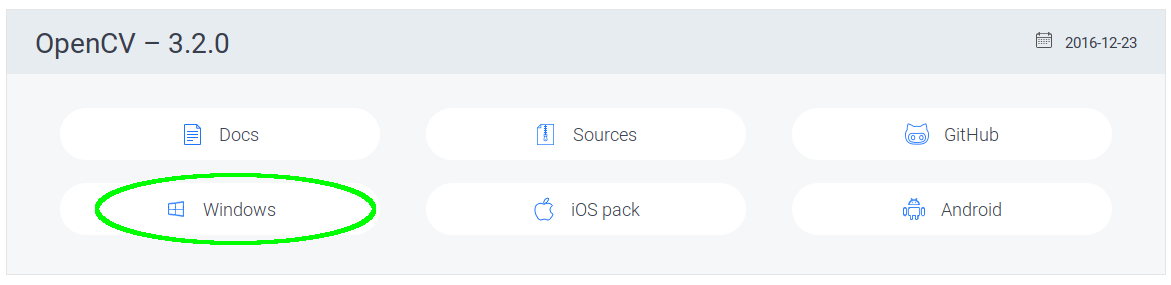
Visit the OpenCV Releases page and advance to find the version you wish to use, as shown to the right, and download the Windows build. This is a 32/64-bit combination build in self-extracting executable form, intended for Windows 7 and later.
-
After downloading, open the containing folder and right-click on the executable. Select "Run as Administrator". In the following pop-up, replace the suggested expansion location with C:\Program Files\. This will expand OpenCV into the C:\Program Files\opencv\ folder.
-
Use Windows Explorer to drill down into C:\Program Files\opencv\build\java and locate the version-specific JAR file for OpenCV. Make a copy of this file and name it opencv.jar (in the same folder). This is the default name the driver module will attempt to load.
-
Add C:\Program Files\opencv\build\x64\vc14\bin and C:\Program Files\opencv\build\java\x64 to the system PATH environment variable, as shown in the System Settings section below. Although the folder containing the JNI DLL file is specified in the driver module, the JNI DLL must be able to locate the rest of the DLLs that comprise the OpenCV library.
-
Open a command prompt and change to the C:\Program Files\opencv\build\x64\vc14\bin directory. Execute opencv_version. It should report the version you installed. Otherwise, obtain and install the VC14 redistributable from Microsoft and try again. (Use a later redistributable if so indicated in the OpenCV folder hierarchy for the version chosen.)

System Settings
Follow these steps to set the system PATH environment variable as required by FFmpeg and OpenCV, and adjust the Ignition Service (if applicable) to permit network video connections:
-
Start by right-clicking on My Computer on your desktop, or This PC in Windows Explorer. If you don't see the System Properties window as shown on the right, you may need to also click on "Advanced System Properties".
Then select Environment Variables.
-
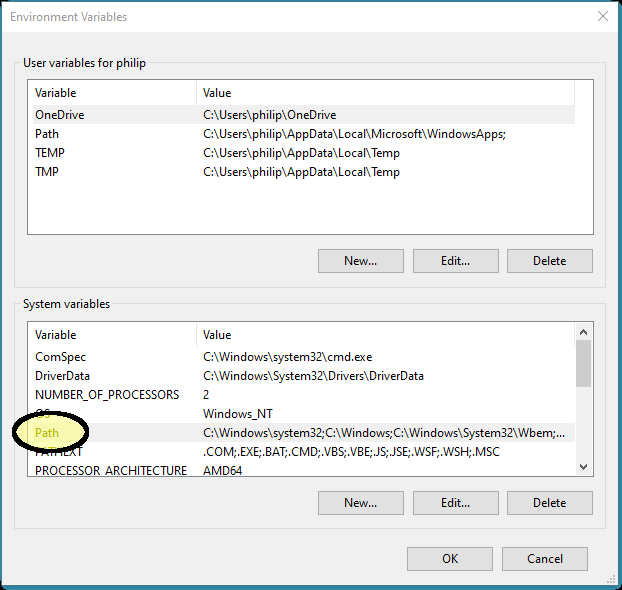
Within the Environment Variables dialog, locate the Path variable in the bottom section, among the System variables. Double-click, or click Edit... to proceed.
-
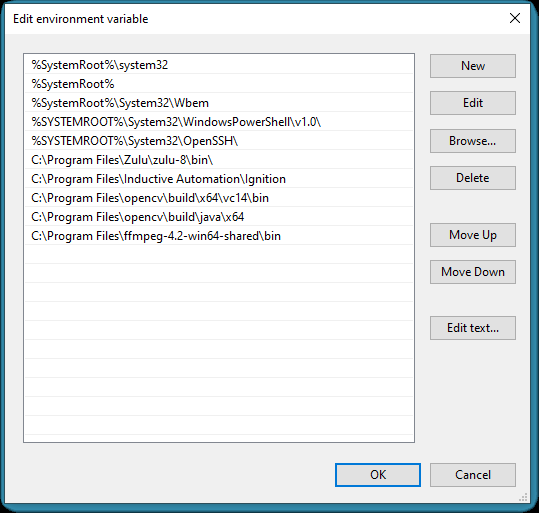
Within the Edit environment variable dialog for the system Path, use the New button to insert the required entries, then click OK. The result should be similar to that shown to the right.
If this Windows machine runs clients or designers, installation is complete for them. Restart all local clients and/or designers for them to recognize the changes and activate OpenCV scripting support. The following step may be omitted if the machine will not be a gateway.
For a gateway, the Ignition Service must be restarted for it to recognize the changes to the system Path. In some situations, a system reboot may be required. Defer that until after changing the service user account (the next step).
-
During installation of Ignition, the Ignition service is set up to use the LOCALSYSTEM account. This account has limited network privileges, such that OpenCV and the FFmpeg library it uses will be unable to make RTSP or similar connections. (It also prevents access to shared drives and folders...)
The simplest way to enable networking is to create a normal local Windows user account, grant it full access to the Ignition install folder hierarchy, and set the service to log in with this account. Automation Professionals recommends the user name Ignition, though any account name will work. The precise steps to follow vary by Windows version.
The Ignition Service must be restarted for it to recognize the changes to its login account.
Ubuntu Linux 24.04 LTS
Ubuntu Server is the primary test platform for development of this driver module under Linux. Ubuntu 24.04 packages a JAR file for OpenCV 4.6 compiled with OpenJDK 21. Unfortunately, this is too new to be loaded by Ignition v8.1, as Ignition uses Java 11 or 17. However, the JNI and FFmpeg libraries can be installed from the Ubuntu repositories. Execute the following command on the gateway for those:
sudo apt install ffmpeg libopencv406-jni
Then, obtain the OpenCV JAR file for Windows for the matching OpenCV version (v4.6.0 in this case). OpenCV for Windows is still compiled for use with Java8, so can be substituted. Place the opencv-4.6.0.jar file in the /usr/share/java/ folder, and rename it to just opencv.jar.
Ubuntu Linux 22.04 LTS
Ubuntu Server is the primary test platform for development of this driver module under Linux. Ubuntu 22.04 packages a Jar file for OpenCV 4.5 compiled with OpenJDK 11. This is perfect for Ignition v8+, as v8 runs with its own copy of Java 11. Execute the following command on the gateway and you should be ready to run:
sudo apt install libopencv4.5-java
Ubuntu Linux 20.04 LTS
Ubuntu Server is the primary test platform for development of this driver module under Linux. Ubuntu 20.04 packages a Jar file for OpenCV 4.2 compiled with OpenJDK 11. This is perfect for Ignition v8+, as v8 runs with its own copy of Java 11. Execute the following command on the gateway and you should be ready to run:
sudo apt install libopencv4.2-java
Ubuntu Linux 18.04 LTS
Ubuntu 18.04 packages a Jar file for OpenCV 3.2.0 compiled with OpenJDK 10. This is perfect for Ignition v8.0, as v8 runs with its own copy of Java 11. Execute the following command on the gateway and you should be ready to run:
sudo apt install libopencv3.2-java
OpenCV Library Location Override
If the default library locations for your platform do not match the preferred OpenCV install locations for your operating system and architecture, you may specify the correct locations (Jar and JNI) in environment variables.
Use STREAMER_OPENCV_JAR to specify the full path to the OpenCV Jar File.
Use STREAMER_OPENCV_JNI to specify the full path(s) to one or more JNI Folders to be searched for the JNI base name. (Per the JAR file internal requirement.) Separate folder names with a semicolon on Windows. Separate with a colon on other operating systems.
In Windows, place the override variables in the System Environment just like the Path settings described above. In Linux, you should add the environment variable(s) to the SystemD service via a normal SystemD override file.Return